

377Uploads
165k+Views
10k+Downloads
Cross-curricular topics
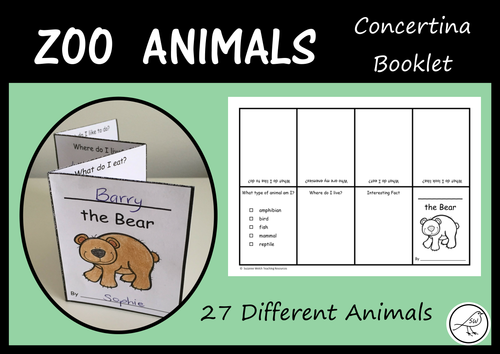
Zoo Animals – Basic Report
A fun concertina booklet to present information about 27 different zoo animals.
The Report Headings:
What do I look like?
What do I eat?
Who are my enemies?
What do I like to do?
Where do I live?
Interesting fact.
What type of animal am I? (amphibian, bird, fish, mammal, reptile – tick the correct box)
Cover page – give the animal a name; write your own name; colour the animal.
How To Construct:
1. Trim around the outside of the page.
2. Fold in half and glue.
3. Concertina fold to make a booklet.
Included:
♦ Template for 27 different zoo animals.
♦ Blank template (to make for other animals).
♦ Construction instructions.
The Animals:
Bear
Cheetah
Crocodile
Elephant
Flamingo
Frog
Giraffe
Gorilla
Hippopotamus
Kangaroo
Koala
Lion
Lizard
Monkey
Panda
Parrot
Peacock
Penguin
Polar Bear
Rhinoceros
Sloth
Snake
Tiger
Toucan
Tortoise
Walrus
Zebra
Designed on A4 size paper. Can be enlarged to allow additional room for writing.
**********************************************************************
© Suzanne Welch Teaching Resources
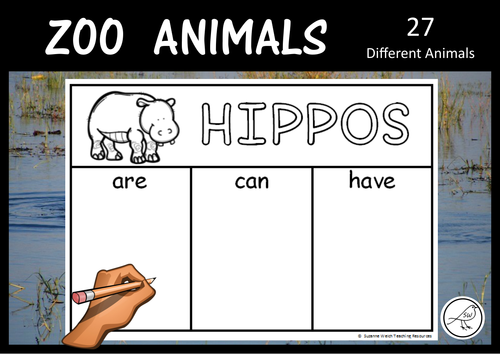
Zoo Animals – are… can… have…
Activity sheets for students to complete to show their knowledge of 27 different animals that are commonly found in zoos.
Suggestions for use:
* showing current knowledge before commencing an animal unit.
* recording knowledge during research.
Included:
• Activity sheet for 27 different animals.
• Blank template
• Alternative spelling for the plural of flamingo (flamingos / flamingoes)
The Animals:
Bear
Cheetah
Crocodile
Elephant
Flamingo
Frog
Giraffe
Gorilla
Hippo
Kangaroo
Koala
Lion
Lizard
Monkey
Panda
Parrot
Peacock
Penguin
Polar Bear
Rhino
Sloth
Snake
Tiger
Toucan
Tortoise
Walrus
Zebra
**********************************************************************
© Suzanne Welch Teaching Resources
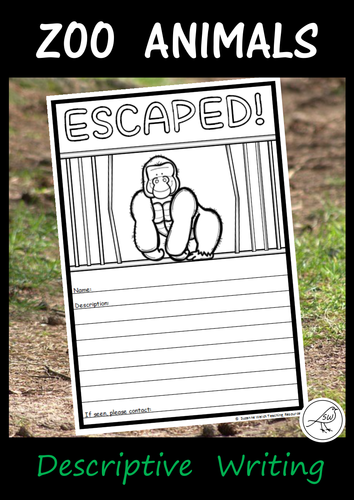
Zoo Animals – Escaped Posters
A fantastic activity for descriptive writing.
Included:
♦ 27 x Templates with words (Name, Description, If seen please contact)
♦ 27 x Templates without words (9 lines to write on)
♦ 2 x Templates without pictures of animals (draw your own). With/without words.
The 27 Animals:
Bear
Cheetah
Crocodile
Elephant
Flamingo
Frog
Giraffe
Gorilla
Hippopotamus
Kangaroo
Koala
Lion
Lizard
Monkey
Panda
Parrot
Peacock
Penguin
Polar Bear
Rhinoceros
Sloth
Snake
Tiger
Toucan
Tortoise
Walrus
Zebra
**********************************************************************
© Suzanne Welch Teaching Resources

Animal Display Templates
Display Templates - 27 different zoo animals.
Suitable for displaying animal facts, poem, etc.
Great for presenting independent research.
Easy to assemble (cut, fold and glue). Instructions included.
Two Options:
♦ Templates with 9 lines for writing on.
♦ Templates without lines (just a blank space).
The Animals:
Bear
Crocodile
Cheetah
Elephant
Flamingo
Frog
Giraffe
Gorilla
Hippopotamus
Kangaroo
Koala
Lion
Lizard
Monkey
Panda
Parrot
Peacock
Penguin
Polar Bear
Rhinoceros
Sloth
Snake
Tiger
Toucan
Tortoise
Walrus
Zebra
Designed on A4 size paper.
**********************************************************************
© Suzanne Welch Teaching Resources
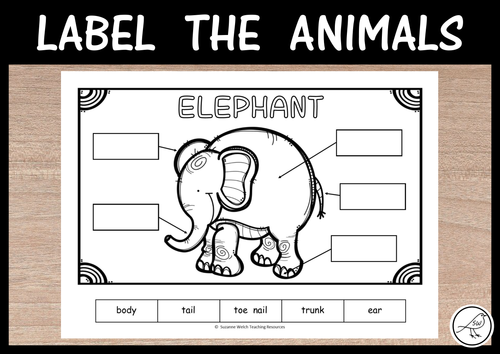
Label the Zoo Animals
A set of 26 zoo animals to label. Perfect for an animal study or as an activity pre/post a field trip to the zoo.
Options:
♦ Cut and glue the labels into the correct boxes.
♦ Use the word bank to write the words into the correct boxes.
The 26 Animals:
Bear
Crocodile
Cheetah
Elephant
Flamingo
Frog
Giraffe
Gorilla
Hippopotamus
Kangaroo
Koala
Lion
Lizard
Monkey
Panda
Parrot
Peacock
Penguin
Polar Bear
Rhinoceros
Sloth
Tiger
Toucan
Tortoise
Walrus
Zebra
There are 5 labels on each picture.
All pages are ‘landscape’ orientation and designed on A4 size paper.
**********************************************************************
© Suzanne Welch Teaching Resources
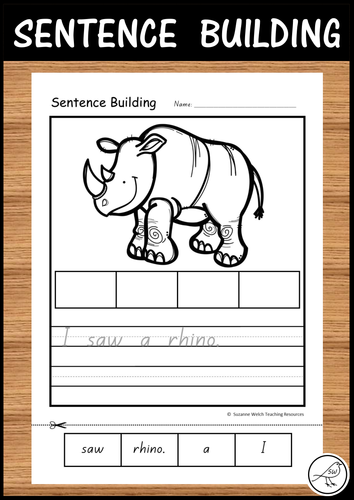
Sentence Building - Zoo Animals
Sentence building worksheets for the New Zealand junior classroom. 25 worksheets in four different formats so you can easily differentiate your student’s learning.
4 Different Formats:
♦ Cut and glue the words.
♦ Cut and glue the words + trace the sentence.
♦ Cut and glue the words + write the sentence.
♦ Cut and glue the words + trace and write the sentence.
Also included are 25 sentence cards that you can use as a teaching aid. These cards contain a coloured picture and the sentence.
The font used is ‘NZ Basic Script’. The letter shapes are the same as those recommended in the NZ Ministry of Education Handbook – ‘Teaching Handwriting’.
The theme is ZOO ANIMALS. The pictures are gorgeous and your students will love adding colour to them.
All of the sentences use high frequency sight words together with the name of the animal. Two of the sentences are questions.
The Sentences:
Look at the lion.
Look at my lizard.
I see a crocodile.
I see the sloth.
Here is a snake.
Here is my tortoise.
Here is the tiger.
I like the flamingo.
We like the cheetah.
He likes the gorilla.
Mum likes her parrot.
Dad saw the elephant.
I saw a rhino.
She saw a peacock.
We saw the bear.
They saw the kangaroo.
This is my toucan.
This is a zebra.
That is a penguin.
That is my monkey.
Where is the walrus?
Where is my frog?
The hippo is big.
The koala is little.
The giraffe is tall.
A fun, effective literacy resource that your students will love.
**********************************************************************
© Suzanne Welch Teaching Resources
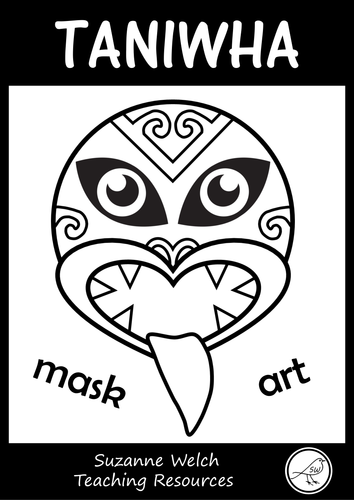
Taniwha - mask, art, wall display
This resource contains black/white and coloured taniwha heads that can be used in a number of ways. For example: masks for drama, art projects and wall displays.
A handy resource when studying Māori myths and legends.
Included:
♦ black/white taniwha for students to colour and personalise. A variety of templates are included (same design but certain features are included/excluded).
♦ coloured taniwha heads x10
♦ coloured taniwha heads and upper body x10
Designed on A4 size paper.
**********************************************************************
© Suzanne Welch Teaching Resources
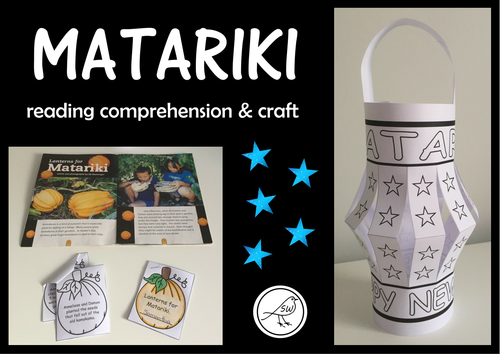
Matariki - Reading comprehension activity and paper lantern craft
Celebrate the Māori New Year with this literacy and craft resource. Read the article in the NZ School Journal, complete the follow-up comprehension activity and then make a paper lantern.
The School Journal article is not provided in this resource.
You will need access to: New Zealand School Journal – Part 1 – Number 3 – 2005
The article is about 2 children who find old kamokamo shells under their Gran’s hedge. They plant the seeds and wait for the new kamokamo to grown. They make lanterns out of the dried shells during Matariki.
Reading Comprehension Activity:
After reading the article in the school journal, students make a kamokamo flip book to show the order that events happened in the article. There are a total of 14 events plus a title page and a back page to colour. The kamokamo are on two A4 pages. There are 2 sets of activity sheets – one set has clues in the stalk of the picture to indicate ‘beginning, middle or end’ (B, M, E). This set is suitable for your students that require some extra support to complete the task. Answers are provided.
Paper Lantern Activity:
There are various templates that you can choose from to print and use. Please click on the ‘Look Inside’ button above to see examples of all templates. Some are for colouring only, and others require your students to add further decoration/patterns. A ‘handle’ template is also included however you may just wish to use scrap paper for this. Instructions are provided.
**********************************************************************
© Suzanne Welch Teaching Resources
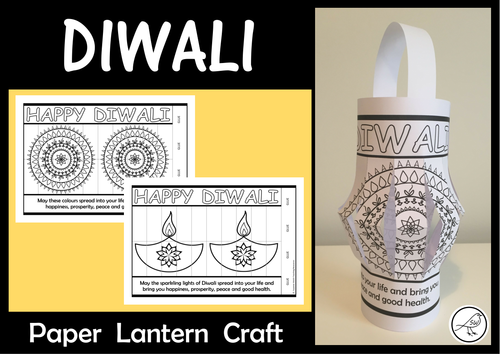
Diwali - Paper lantern craft
Celebrate Diwali (The Festival of Lights) by making these paper lanterns. Fun, easy to make and they look great hanging in the classroom.
Included:
♦ 10 x different templates
♦ Handle template (just cut paper strips if you want to cut down on printing)
♦ Construction instructions
♦ One substitute template for the spelling of the word colour/color
A variety of templates to suit what you are looking for. Some are plain (so your students can add their own patterns/designs) while others are already decorative and just need colouring.
Designed on A4 size paper.
**********************************************************************
© Suzanne Welch Teaching Resources
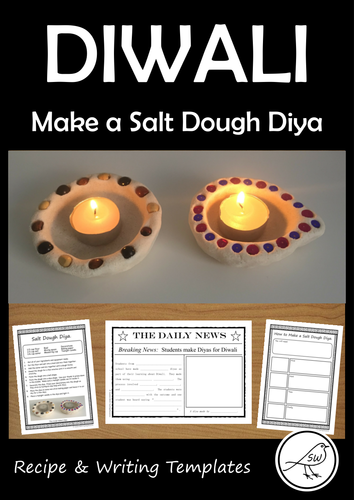
Diwali – Make a Salt Dough Diya
A fun, easy craft activity for celebrating Diwali (The Festival of Lights).
Follow the instructions to make a diya out of salt dough and leave it to air dry for a few days. Decorate before drying (like the images provided), or dry and then paint/decorate.
MAKING THE DIYA:
Resources to assist with making the diya include:
♦ Teacher notes (with lots of ideas and hints).
♦ Recipe for your students to follow (makes 1 diya).
♦ Sequencing Cards – use as a recipe or as a sequencing task before making. These include pictures and text.
WRITING TASKS:
Two writing tasks are included as a follow-up to the craft activity.
♦ procedural / instructional writing (3 different templates).
♦ newspaper report writing (2 different templates plus an example).
One of the newspaper reports is a fill-in-the-blanks template which is suitable for junior students.
The instructions state to air dry the diya (takes a few days) but you could choose to dry it in the oven to speed up the process (details included in the teacher notes).
WHAT YOU NEED:
Flour, salt and water. Things to decorate it with (buttons, beads, shells, glitter, paint, etc).
If you have junior students, this is a great activity for you to do with a buddy class who are a bit older.
**********************************************************************
© Suzanne Welch Teaching Resources
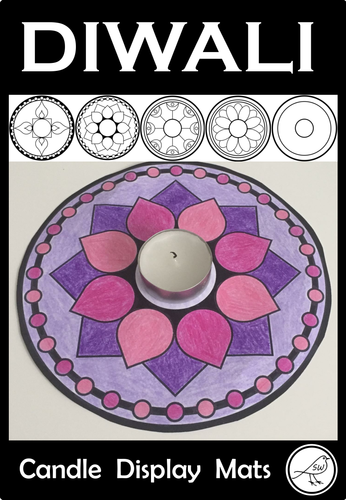
Diwali – Candle Display Mats
A fun, effective art activity for your students when celebrating Diwali (The Festival of Lights).
Colour, cut and place a tealight candle in the centre. Laminate if desired.
Included:
♦ 4 x templates with a design
♦ 1 x blank template (students design their own pattern)
Size:
Approximately 16.5cm in diameter.
Provided in 2 paper sizes:
♦ A4 paper
♦ Letter paper
**********************************************************************
© Suzanne Welch Teaching Resources
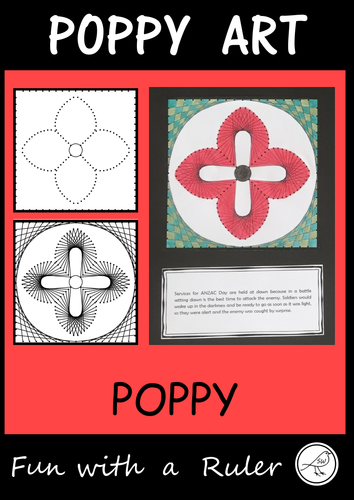
Poppy Art – ANZAC Day, Remembrance Day, Memorial Day, Armistice Day (Design D)
A super-fun art project for your students when celebrating special days such as:
♦ ANZAC Day
♦ Remembrance Day
♦ Memorial Day
♦ Armistice Day
This project involves your students ruling straight lines between 2 dots on a template, to create poppy inspired art work. This is Design D (poppy).
Included:
♦ Template
♦ Example – black/white and colour
♦ Instructions
Level of Difficulty:
Your students need to be able to use a ruler to draw straight lines between 2 points (even the curves are made with straight lines … it’s like magic!). The designs look more complicated than they actually are. Concentration is required, but the actual process is not difficult.
Instructions:
Simple, clear, easy-to-follow instructions are provided. One instruction per page (image and a sentence). Display the instructions via a data projector if you have access to one. Otherwise print and enlarge them and/or demonstrate on an enlarged template.
Equipment Needed:
You need a ruler and a pen (black works best). Something to colour with (eg coloured pencils, watercolours, felt tip markers, chalk pastels, dye, etc)
Size:
The artwork measures approximately 17cm x 17cm. Designed on A4 size paper.
This is Design D (poppy). Other designs are also available in my store:
Design A - wreath
Design B - cross
Design C - medal
Keywords: string art, parabolic curves, math, geometry, patterns, war, symbolism, veteran
**********************************************************************
© Suzanne Welch Teaching Resources
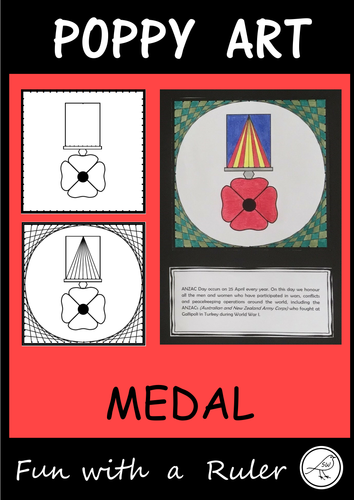
Poppy Art – ANZAC Day, Remembrance Day, Memorial Day, Armistice Day, etc (Design C)
A super-fun art project for your students when celebrating special days such as:
♦ ANZAC Day
♦ Remembrance Day
♦ Memorial Day
♦ Armistice Day
This project involves your students ruling straight lines between 2 dots on a template, to create poppy inspired art work. This is Design C (medal).
Included:
♦ Template
♦ Example – black/white and colour
♦ Instructions
Level of Difficulty:
Your students need to be able to use a ruler to draw straight lines between 2 points (even the curves are made with straight lines … it’s like magic!). The designs look more complicated than they actually are. Concentration is required, but the actual process is not difficult.
Instructions:
Simple, clear, easy-to-follow instructions are provided. One instruction per page (image and a sentence). Display the instructions via a data projector if you have access to one. Otherwise print and enlarge them and/or demonstrate on an enlarged template.
Equipment Needed:
You need a ruler and a pen (black works best). Something to colour with (eg coloured pencils, watercolours, felt tip markers, chalk pastels, dye, etc)
Size:
The artwork measures approximately 17cm x 17cm. Designed on A4 size paper.
This is Design C (medal). Other designs are also available in my store:
Design A - wreath
Design B - cross
Design D - poppy
Keywords: string art, parabolic curves, math, geometry, patterns, war, symbolism, veteran
**********************************************************************
© Suzanne Welch Teaching Resources
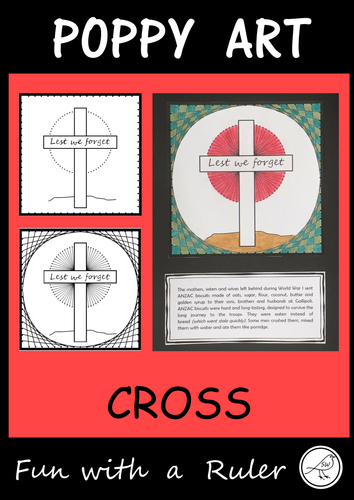
Poppy Art – ANZAC Day, Remembrance Day, Memorial Day, Armistice Day, etc (Design B)
A super-fun art project for your students when celebrating special days such as:
♦ ANZAC Day
♦ Remembrance Day
♦ Memorial Day
♦ Armistice Day
This project involves your students ruling straight lines between 2 dots on a template, to create poppy inspired art work. This is Design B (cross).
Included:
♦ Template
♦ Example – black/white and colour
♦ Instructions
Level of Difficulty:
Your students need to be able to use a ruler to draw straight lines between 2 points (even the curves are made with straight lines … it’s like magic!). The designs look more complicated than they actually are. Concentration is required, but the actual process is not difficult.
Instructions:
Simple, clear, easy-to-follow instructions are provided. One instruction per page (image and a sentence). Display the instructions via a data projector if you have access to one. Otherwise print and enlarge them and/or demonstrate on an enlarged template.
Equipment Needed:
You need a ruler and a pen (black works best). Something to colour with (eg coloured pencils, watercolours, felt tip markers, chalk pastels, dye, etc)
Size:
The artwork measures approximately 17cm x 17cm. Designed on A4 size paper.
Other designs are also available (in my store):
* Design A - wreath
* Design C - medal
* Design D - poppy
© Suzanne Welch Teaching Resources
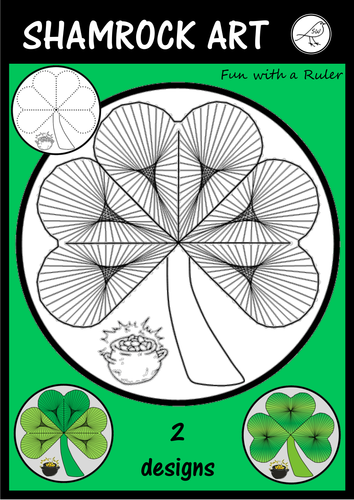
St Patrick's Day Art - Shamrock
A ‘Fun with a Ruler’ art project for your students to complete on St Patrick’s Day. There are 2 different templates to choose from.
This project involves your students ruling straight lines between 2 dots on a template. When they have finished drawing all of the lines they can give their artwork some colour.
There is space at the bottom of each template for a writing task that you may wish to set (eg ‘If I found a pot of gold I would …’). If you don’t want this, simply cut the artwork out when finished.
Included:
♦ Shamrock with pot of gold.
♦ Shamrock without pot of gold.
♦ Shamrock – draw your own stem, without pot of gold.
♦ Practise template.
♦ Example of the completed design.
♦ Instructions.
The templates are provided in both black and light grey dots.
Level of Difficulty:
Your students need to be able to use a ruler to draw straight lines between 2 points. The designs can look more complicated than they actually are. Concentration is required, but the actual process is not difficult.
Instructions:
Simple, clear, easy-to-follow instructions are provided. One instruction per page (image and a sentence). Display the instructions via a data projector if you have access to one. Otherwise print and enlarge them and/or demonstrate on an enlarged template.
Practise Tempate:
A practise template is included for your students to practise ruling the pattern before you give them the actual template.
Equipment:
You need a ruler and a pen (black or green works best for this project). Something to colour with (eg coloured pencils, watercolours, felt tip markers, chalk pastels, dye, etc)
Keywords: string art, math, geometry, patterns, Ireland, Irish, luck.
© Suzanne Welch Teaching Resources

Christmas Art - Angels
A ‘Fun with a Ruler’ art project for your students to complete during the Christmas season. There are 3 different templates to create 3 slightly different angels.
This project involves your students ruling straight lines between 2 dots on a template. When they have finished drawing all of the lines they can give the head some detail (hair, eyes, mouth, etc) and give their artwork some colour.
Included:
♦ 3x templates – black dots
♦ 3x examples – black/white
♦ 3 x instructions
♦ Teacher notes
Level of Difficulty:
Your students need to be able to use a ruler to draw straight lines between 2 points (the curves are made with straight lines … it’s like magic!). The designs can look more complicated than they actually are. Concentration is required, but the actual process is not difficult.
Instructions:
Simple, clear, easy-to-follow instructions are provided. One instruction per page (image and a sentence). Display the instructions via a data projector if you have access to one. Otherwise print and enlarge them and/or demonstrate on an enlarged template.
Equipment:
You need a ruler and a pen (black works best). Something to colour with (eg coloured pencils, watercolours, felt tip markers, chalk pastels, dye, etc)
Keywords: parabolic curves, math, geometry, patterns, string art, Xmas
© Suzanne Welch Teaching Resources

Poppy Art – ANZAC Day, Remembrance Day, Memorial Day, Armistice Day, etc (Design A)
A super-fun art project for your students when celebrating special days such as:
♦ ANZAC Day
♦ Remembrance Day
♦ Memorial Day
♦ Armistice Day
This project involves your students ruling straight lines between 2 dots on a template, to create poppy inspired art work. This is Design A (wreath).
Included:
♦ Template
♦ Example – black/white and colour
♦ Instructions
Level of Difficulty:
Your students need to be able to use a ruler to draw straight lines between 2 points (even the curves are made with straight lines … it’s like magic!). The designs look more complicated than they actually are. Concentration is required, but the actual process is not difficult.
Instructions:
Simple, clear, easy-to-follow instructions are provided. One instruction per page (image and a sentence). Display the instructions via a data projector if you have access to one. Otherwise print and enlarge them and/or demonstrate on an enlarged template.
Equipment Needed:
You need a ruler and a pen (black works best). Something to colour with (eg coloured pencils, watercolours, felt tip markers, chalk pastels, dye, etc)
Size:
The artwork measures approximately 17cm x 17cm. Designed on A4 size paper.
These designs are also available (in my store):
* Design B - cross
* Design C - medal
* Design D - poppy
Keywords: string art, parabolic curves, math, geometry, patterns, war, symbolism, veteran
© Suzanne Welch Teaching Resources

Poppy Art – Remembrance Day, Memorial Day, Armistice Day, Anzac Day.
A ‘Fun with a Ruler’ art project for your students to complete leading up to Remembrance Day / Memorial Day / Armistice Day / Anzac Day.
This project involves your students ruling straight lines between 2 dots on a template, to create a poppy. Your students could write something in the petals before colouring (eg facts, opinons, a 4 line poem, etc). Display them together to make a 'poppy patchwork quilt'.
Included:
♦ Template – black dots
♦ Template – light grey dots
♦ Example – black/white
♦ Instructions
♦ Teacher notes
Level of Difficulty:
Your students need to be able to use a ruler to draw straight lines between 2 points (the curves are made with straight lines … it’s like magic!). The design looks more complicated than it actually is. Concentration is required, but the actual process is not difficult. A pattern is repeated 8 times.
Instructions:
Simple, clear, easy-to-follow instructions are provided. One instruction per page (image and a sentence). Display the instructions via a data projector if you have access to one. Otherwise print and enlarge them and/or demonstrate on an enlarged template.
Equipment:
You need a ruler and a pen (black works best). Something to colour with (eg coloured pencils, watercolours, felt tip markers, chalk pastels, dye, etc)
Size:
The artwork measures approximately 17cm x 17cm. Designed on A4 size paper.
Keywords: string art, parabolic curves, math, geometry, patterns, war, symbolism, veteran,
© Suzanne Welch Teaching Resources

Star Art – Templates – Set A
Fun With Lines. Dotty templates to create 4 different stars. Simply draw straight lines connecting the dots on the templates and wonderful designs with appear … such fun!
Included:
♦ 4 different star templates
♦ Example stars – black lines
♦ Exampe stars - coloured
♦ Easy-to-follow instructions (with images)
The Process:
♦ Draw the lines.
♦ Colour your artwork.
♦ Cut the artwork out around the circle.
♦ Display the stars.
The Instructions:
I have provided step-by-step instructions that show you how to complete the artwork. Each step is on one page with concise, kid-friendly instructions and an image. Print them out or display via a data projector – a great way for your students to self-check and manage their own learning. (Plus it will save you from having to answer millions of “Is this right?” questions!)
The Practise Part:
At the bottom of 2 of the templates there is a section to practise ruling the lines and getting the hang of the patterns before attempting it on the actual template.
The artwork looks tricky …. but it is actually very simple!
Skill enhancement: ruling straight lines with precision.
Keywords: parabolic curves, string art, line art, geometry, math, ruler, straight lines, star, space, galaxy,
© Suzanne Welch Teaching Resources

Star Art - using parabolic curves
Fun With Lines. Templates to create 4, 5, 6 and 8 point stars. Draw straight lines connecting the dots on the templates and curves will magically appear … such fun! (Parabolic Curves).
Included:
♦ 4x student templates – 4, 5, 6 and 8 point stars
♦ Example stars
♦ Easy-to-follow instructions (with images)
The Process:
♦ Draw the lines.
♦ Colour your artwork.
♦ Cut the artwork out around the circle.
♦ Display the stars.
The Instructions:
I have provided 7 steps to complete the artwork. Each step is on one page with concise instructions and an image. Print them out or display via a data projector – a great way for your students to self-check and manage their own learning. (Plus it will save you from having to answer millions of “Is this right?” questions!)
The Practise Part:
At the bottom of each template there is a section to practise ruling the lines and getting the hang of making parabolic curves before attempting it on the actual template.
The artwork looks tricky …. but it is actually very simple!
Skill enhancement: ruling straight lines with precision.
Keywords: parabolic curves, string art, line art, geometry, math, ruler, straight lines, star, space, galaxy,
© Suzanne Welch Teaching Resources